Krazy Stitcher Studio User Manual
Browser-based bead pattern maker — no account, no install, no limits. • v3.6.70
1. Before You Start
Verify these requirements before you begin:
- Browser — Use a current version of Chrome, Firefox, Edge, or Safari. Krazy Stitcher requires JavaScript and IndexedDB support.
- Screen size — Use a desktop or laptop screen (1024px wide or larger). The canvas tools are not optimized for phones or small tablets.
- Storage — Krazy Stitcher saves patterns to your browser's IndexedDB. This storage persists across sessions but is tied to your browser and domain. Clear your browser data and the patterns are gone. Export important work as
.ksor.kspfiles. - Internet — Not required after the initial page load. The app runs entirely in your browser.
2. Get Started
Krazy Stitcher runs entirely in your browser. Open KrazyStitcher.html and start working.
Creating Your First Pattern
Click the New button in the top toolbar. A dialog opens. Give your pattern a name and choose a stitch type (Loom is the simplest). Set the width and height in beads, then click Create. An empty grid appears on the canvas.
Your First Beadwork
The Draw tool starts as the active tool. Pick a color from the palette on the right side panel, then click or drag on the canvas to paint beads. Switch colors anytime by clicking a different swatch. That's the core workflow — everything else builds on it.
Saving
Click Save to store your pattern in the browser's IndexedDB. Storage persists across sessions. For backup or sharing, use Export Pattern to save a .ks file.
3. Navigate the Interface
The Krazy Stitcher interface has five main areas:
| Area | Location | Purpose |
|---|---|---|
| Top Toolbar | Top of screen | File operations, edit actions, transform tools, color tools, toggles, help |
| Tool Panel | Left side | Drawing tools and zoom controls (icon buttons) |
| Canvas | Center | The main editing area where you draw your pattern |
| Right Panel | Right side | Color palette, used colors, saved pattern list |
| Status Bar | Bottom | Pattern size, type, bead count, color count, storage info |
Canvas Navigation
Scroll your mouse wheel to zoom in and out. To prevent accidental zooming, click the lock icon (🔒) below the zoom buttons in the left toolbar — the icon changes to 🔓 when locked. Hold Space and drag to pan the canvas, or click the Pan tool in the tool panel (it stays selected until you pick another tool). The bottom-right corner shows the current zoom level. Click the Fit button (or press Home) to zoom the entire pattern into view.
The bottom-left corner shows the current bead coordinates as you move the mouse over the canvas.
Grid Opacity and Large Print
In the row of buttons across the top, the Opacity slider next to Grid fades the grid lines, so the bead colors show through more clearly. Slide it to 0 to hide them completely. The Large Print button near the right end of that row switches to bigger text and bolder grid lines, and turns the row and column numbers on. Click it again to switch back.
Every 10th row and column has a heavier line, a dark line with a light edge, so you can count beads and find your place. These lines belong to the grid: they show when Grid is ticked, fade as the Opacity slider goes toward 0, and are left out when you zoom so far out that each bead is only a few pixels wide.
Floating Help Button
The round ? button fixed in the bottom-right corner of the screen opens the in-app help panel from anywhere. Click it whenever you need a quick reminder about tools, shortcuts, or features. The help panel slides out from the right and can be closed with the × button or by pressing Escape.
4. Use the Drawing Tools
| Tool | Key | How It Works |
|---|---|---|
| Draw | D | Click or drag to paint beads with the selected color. This is the default tool. |
| Erase | E | Click or drag to remove beads (sets beads to empty or white). |
| Fill | F | Click a bead to flood-fill all connected beads of the same color with the selected color. Uses 4-directional connectivity. |
| Color Pick | I | Click any bead to make its color the active drawing color. Works like an eyedropper. |
| 1 Cell | — | Click a bead, then choose a color for that one bead from a small window. See Change One Bead. Its button, just below Pick, shows a pencil and a small 1. |
| Line | L | Press the left mouse button on the start point, drag to the end point, and let go to draw a straight line between the two points. |
| Rectangle | R | Press the left mouse button on one corner, drag to the opposite corner, and let go to draw a rectangular outline. |
| Filled Rect | Shift+R | Press the left mouse button on one corner, drag to the opposite corner, and let go to draw a solid filled rectangle. Its button in the tool panel is labeled Fill R. |
| Select | S | Click and drag to select a rectangular region. See Select, Copy, and Paste. |
| Text | T | Opens a dialog to enter text, then click to place it. See Place Text on the Canvas. |
| Pan | Space | Press the left mouse button on the canvas and drag to move the pattern around. The Pan tool stays selected until you pick another tool. You can also hold Space while another tool is active to pan; your tool comes back when you let go. |
Change One Bead
The Draw tool paints with the color you have selected. When you want to change a single bead to a different color from the pattern, without selecting that color first, use the 1 Cell tool.
- Click 1 Cell in the row of tools down the left side of the screen (just below Pick).
- Click the bead you want to change. A small window opens, headed with the bead’s column and row, and showing the color it has now.
- Click the color you want, or press the key of its symbol (for example A, 7 or @). Only that bead changes, and the window closes.
The window lists every color already in the pattern, each with its symbol. You can move around it with the arrow keys and Tab. Empty this cell clears the bead. If the color you are drawing with is not in the pattern yet, it appears as a + button. Close or Esc leaves without changing anything.
Shortcuts that work with any tool: press the right mouse button on a bead, or hold Alt and click it, to open the same window. With a touch screen, choose the 1 Cell tool and tap the bead. A bead outside the shape of a shaped pattern cannot be changed.
5. Choose a Stitch Type
Krazy Stitcher Studio supports twenty-five stitch types. The stitch type controls how the app arranges beads on the grid. It also affects the coordinate system and finished size calculations.
| Stitch | Grid Layout | Best For |
|---|---|---|
| Loom | Straight square grid, all rows and columns aligned | Loom beadwork, beginners, geometric patterns |
| Peyote | Odd rows offset right by half a bead width | Flat peyote stitch, the most popular off-loom stitch |
| Brick | Odd columns offset down by half a bead height (peyote rotated 90°) | Brick stitch earrings, small shapes |
| Peyote 2-Drop | Pairs of rows share the same offset | Faster beading with two beads picked up per stitch |
| Peyote 3-Drop | Groups of three rows share the same offset | Even faster multi-drop peyote |
| Peyote 4–9 Drop | Groups of 4 through 9 rows share the same offset | Advanced multi-drop peyote for wide, fast-coverage patterns |
| Gourd Stitch | Alternating row offset (like peyote), used tubularly | Tubular peyote for covering round objects like bottles, ornaments |
| Herringbone | Square grid with pair-bracket visual guides every two columns | Herringbone (Ndebele) stitch visualization |
| RAW | Square grid with cross-stitch visual guides showing the four-bead units | Right Angle Weave visualization |
| Square Stitch | Straight square grid, identical layout to Loom | Individually-stitched square patterns; same grid as Loom, different thread path |
| Spiral Rope | Each row rotates a quarter bead width, wrapping every four rows | Tubular spiral rope necklaces and bracelets |
| Dutch Spiral | Same quarter-bead rotation as Spiral Rope | Two-color spiral rope with a twisting accent stripe |
| Netting | Open, lacy diagonal lattice — rows offset by a third of a bead width | Net-like, zigzag jewelry and edging |
| Ladder Stitch | Beads stacked in pairs, one directly above the next | Foundation rows used to start herringbone and brick stitch projects |
| Albion Stitch | Ornamental grid guides marking 3×3 unit blocks | Decorative combination pieces mixing seed beads and crystals |
| Bead Crochet Rope | Progressive diagonal offset — each row shifts by a fraction of a bead width | Tubular bead crochet ropes and necklaces |
6. Work with Color Palettes
Krazy Stitcher ships with nine bead color palettes:
| Palette | Colors | Notes |
|---|---|---|
| Miyuki Delica | 950 colors | Comprehensive Miyuki Delica 11/0 cylinder bead palette. Each color has a DB product ID. Colors for 446 of the beads are estimated from supplier photos. |
| Toho Round | 412 colors | Toho 11/0 round seed beads with TR-11 product IDs. Colors are estimated from supplier photos. |
| Preciosa | 253 colors | Czech Preciosa seed bead colors with PR product IDs. Colors are estimated from supplier photos. |
| Miyuki Rocailles | 238 colors | Miyuki 11/0 round seed beads (rocailles). Each color has an RR product ID. Colors are estimated from supplier photos. |
| Matsuno | 126 colors | Japanese Matsuno 11/0 seed beads with MT product IDs. Colors are estimated from supplier photos. |
| Mill Hill | 115 colors | Mill Hill glass seed beads with MH product IDs. Popular in cross-stitch and needlework. Colors are estimated from supplier photos. |
| Toho Aiko | Coming soon | Toho Aiko precision cylinder beads (1.75mm × 1.0mm). Listed in the palette menus but not selectable until its color data is added. |
| Toho Treasure | Coming soon | Toho Treasure 11/0 precision cylinder beads (1.7mm × 1.3mm). Listed in the palette menus but not selectable until its color data is added. |
| Generic 64 | 64 colors | A basic set of named colors, not tied to any brand. |
Finding Colors
Use the search box above the palette to filter by color name or ID. Type "blue" to see all blue-family colors, or "DB0325" to find a specific Miyuki shade.
Used Colors
Below the palette grid, the Used in Pattern section shows every color currently present in your pattern. Click one with the left mouse button to select it for drawing. Each little square shows the symbol that color has on the chart. To give a color a different symbol, see Choose Your Own Symbols.
Highlight One Color on the Chart
To see where one color is on the chart, tick Highlight the chosen symbol on the chart. It is just above the Used in Pattern list. Then choose a color: click it in Used in Pattern or in the palette, or click a bead on the chart with the Pick tool.
- Every other bead fades back, and every bead of the chosen color gets a bright magenta outline. Stray single beads are easy to spot.
- Choose another color to move the highlight. Untick the box to turn it off.
- The box starts unticked, and the browser remembers your choice. It changes only what you see on the screen, not the pattern, exported pictures or printouts.
Combine it with Change One Bead: highlight a color, then use the 1 Cell tool on any stray beads.
7. Create Custom Palettes
You can create your own palettes and save them for future use. Custom palettes store in your browser alongside your patterns.
Save a Palette from Your Pattern
- Open a pattern that contains the colors you want to save.
- Click Save Palette below the brand dropdown.
- Enter a name for the palette (e.g., “Sunset Bracelet Colors”).
- The app saves all colors from your pattern as a new custom palette.
Create an Empty Palette
- Click + New below the brand dropdown.
- Enter a name for the palette.
- Select colors from any brand palette and click Add Current Color in the Manage dialog to build your palette.
Manage Custom Palettes
Click Manage to open the palette manager. From this dialog you can:
- Use — Switch to a custom palette.
- Rename — Change the palette name.
- Add Current Color — Add the color you have selected to the active custom palette.
- Delete — Remove a custom palette permanently.
Custom palettes appear in the brand dropdown with a ★ prefix.
8. Draw with Symmetry
Symmetric Drawing Mode mirrors your brush strokes across one or two axes. This is useful for patterns with bilateral or four-way symmetry, such as mandalas, medallions, and snowflakes.
How to Use Symmetry
- Click the ⊜ button in the tool panel on the left or press M to cycle through symmetry modes.
- Draw on one side of the pattern. The app mirrors each stroke automatically.
- Press M again to cycle to the next mode or return to normal drawing.
Symmetry Modes
| Mode | What It Does |
|---|---|
| None | Normal drawing with no mirroring (default). |
| Horizontal | Mirrors left to right across a vertical center line. |
| Vertical | Mirrors top to bottom across a horizontal center line. |
| Both | Mirrors across both axes. Draw in one quadrant and all four quadrants fill. |
Red dashed guide lines show the active symmetry axes on the canvas. The Draw, Erase, Line, Rectangle, and Filled Rect tools all support symmetric drawing.
9. Show Row and Column Numbers
Row and column numbers help you locate specific beads, count rows, and follow instructions. They appear along the top and left edges of the canvas.
Toggle Numbers
- Check or uncheck the Numbers checkbox in the toolbar.
- Or press N to toggle numbers on or off.
Adaptive Display
The numbers adjust to your zoom level:
- High zoom (18+ pixels per bead) — Every row and column is numbered.
- Medium zoom (10–17 pixels per bead) — Every 5th row and column is numbered.
- Low zoom (5–9 pixels per bead) — Every 10th row and column is numbered.
- Very low zoom (below 5 pixels per bead) — Numbers are hidden to avoid clutter.
10. Add Pattern Notes
Click Notes in the toolbar to open the notes panel for the active pattern. Use notes to record construction tips, bead brand preferences, row-specific reminders, or any information you want to keep with the pattern.
How to Use
- Open a pattern.
- Click Notes in the toolbar.
- Type your notes in the text area. Notes save automatically as you type.
- Click Close when finished.
Notes are stored with the pattern in IndexedDB and included when you export as a .ks or .ksp file. When someone imports your pattern, they see your notes.
11. Generate a Color Gradient
The Gradient Generator fills the entire canvas with a smooth transition between two palette colors. Each step in the gradient snaps to the nearest color in the active palette, so the result uses real bead colors.
How to Use
- Click Gradient in the toolbar.
- Select a color from the palette, then click Use Current next to "Start Color."
- Select a different color from the palette, then click Use Current next to "End Color."
- Choose a direction: Horizontal, Vertical, or Diagonal.
- Drag the Steps slider to control how many color bands the gradient uses. The preview bar updates in real time.
- Click Apply Gradient to fill the canvas.
| Direction | Description |
|---|---|
| Horizontal | Color transitions from left to right across columns. |
| Vertical | Color transitions from top to bottom across rows. |
| Diagonal | Color transitions from top-left corner to bottom-right corner. |
12. Import and Convert a Photo
Krazy Stitcher can convert any photograph or image into a bead pattern. There are several ways to load an image:
Loading an Image
| Method | How It Works |
|---|---|
| Drag and drop | Drag any image from Finder, Photos, your Desktop, iCloud Drive, a USB drive, or a shared network drive directly onto the canvas area. The Import Photo dialog opens automatically with your image pre-loaded. |
| Paste from clipboard | Copy an image from any app or take a screenshot (Cmd+Shift+4 on Mac), then press Cmd+V (Mac) or Ctrl+V (Windows). The image loads straight into the Import Photo dialog. |
| Click Import Photo | Opens the Import Photo dialog. Click the "Drop image here or click to browse" zone to open your system file picker. On Mac, this gives you full access to local drives, iCloud Drive, network shares, external drives, and any mounted volume. On Windows, it opens File Explorer with access to all connected drives. |
| Drop into the dialog | If the Import Photo dialog is already open, drag an image directly onto the drop zone at the top of the controls panel. |
Settings
| Setting | What It Does |
|---|---|
| Max Width | Maximum width of the resulting pattern in beads. The app calculates height from the image aspect ratio and the bead aspect ratio. |
| Max Colors | Drag the slider to set the target number of colors (2–256). The preview updates in real time as you drag, so you can see exactly how the palette reduction affects the image. With the expanded palettes (up to 950 bead colors), higher values give more faithful color reproduction. |
| Bead Type | The stitch type for the new pattern. Affects aspect ratio calculations. |
| Quantization | Median Cut is fast and produces good results. K-Means is slower but often finds more accurate color groupings, especially for images with subtle gradients. |
| Primary Dither | Controls how color transitions are smoothed. None maps each pixel directly to its nearest bead color. Floyd-Steinberg is a reliable all-rounder. Atkinson makes edges pop and boosts contrast — great for landscapes and architecture. Stucki is the smoothest, ideal for skies and gradients. Sierra falls between smooth and sharp. Burkes is similar to Stucki but faster on large patterns. |
| Secondary Dither | Optional. Pick a second algorithm to blend with the primary. The Blend slider controls the mix — 0% uses only the primary, 100% uses only the secondary. Try Atkinson + Stucki at 50% for crisp subjects with smooth backgrounds. |
| Blend | Appears when a secondary dither is selected. Controls the blend ratio between the two dithering algorithms (0–100%). |
| Brightness | Lighten or darken the image before conversion (-100 to +100). |
| Contrast | Increase or decrease tonal range (-100 to +100). |
| Saturation | Boost or reduce color intensity (-100 to +100). Set to -100 for grayscale. |
| Auto-Optimize Settings | A button below the sliders. Click it and the program looks at your photo and sets Max Colors and Primary Dither for you. A line of text under the button tells you what it chose, and the preview updates. It does not change Max Width, Brightness, Contrast, or Saturation. You can still change any setting afterward. |
Grayscale Mode
Grayscale Mode is a checkbox in the Import Photo dialog that restricts the bead palette to neutral (gray/white/black) colors only.
- Auto-Detection — When you import a black-and-white or grayscale photo, Krazy Stitcher Studio automatically detects it (an “AUTO-DETECTED” badge appears next to the checkbox) and enables Grayscale Mode for you. This eliminates unwanted color artifacts — like teal or blue tints — that can appear when converting B/W images with a full-color palette.
- Manual Override — You can also check the Grayscale Mode box yourself on any image to force a neutral-only palette. This is useful for creating monochrome versions of color photos.
- How it works — Grayscale mode desaturates all pixels to pure luminance values and filters the bead palette down to beads where the RGB channel spread is 35 or less, ensuring clean gray-to-gray conversions.
Preview
The dialog shows a side-by-side preview: your original image on the left and the converted bead pattern on the right. Click the Side/Stack toggle to switch between side-by-side and stacked (vertical) comparison. Stacked mode shows larger previews, making it easier to compare fine details. All sliders update the preview automatically as you drag them. You can also click Update Preview manually. When satisfied, click Import to create the pattern.
Sample Photo
Click Try Sample Photo below the Update Preview button to load a built-in test image. Use it to experiment with different dithering combinations and see how they affect the output before loading your own photo.
Presets
Save up to three favorite dithering configurations as presets. After dialing in settings you like, click Save and choose a slot (1, 2, or 3). Click a preset button to instantly restore those settings. Presets persist between sessions, so you can build a library of go-to settings for different types of images — one for portraits, one for landscapes, one for graphics.
Batch Photo Import
Batch Photo Import converts several photos into separate patterns in one pass, instead of importing them one at a time. It's built for turning a folder of product photos into ready-to-stitch patterns — handy for prepping a whole batch of shop listings at once.
- Click Batch Photo Import in the toolbar.
- Click Choose Files and select the photos you want to convert. You can select multiple files at once.
- Review the file list to confirm your selection.
- Click Start Batch Import.
Krazy Stitcher Studio converts the photos one at a time, showing which file is currently processing. Each photo becomes its own new saved pattern, named after its source file. When the batch finishes, a summary reports how many patterns were created and switches you to the last one made.
| Situation | What Happens |
|---|---|
| Two files share a name | The second pattern gets a number added, for example “necklace” and “necklace (2)”. |
| A file fails to convert | That file is skipped and listed in the summary. The rest of the batch keeps going. |
| You batch-import a photo you already imported before | A new pattern is created with the same name as before — this matches how single-photo Import Photo already works. |
To go the other direction — exporting several saved patterns to PDF or PNG at once — see Batch Export under Export and Share Patterns.
13. Manage Colors
Recolor (Global Color Replace)
Click Recolor in the toolbar. Select a "From" color and a "To" color from the dropdowns. The dropdowns list only colors in the current pattern. Click Replace. The app instantly changes every bead of the "From" color to the "To" color.
Merge Colors
Click Merge to combine two colors. Select the color you want to eliminate ("Merge This Color") and the color to replace it with ("Into This Color"). This is especially useful after photo import when the quantizer produces near-duplicate shades.
Reduce Colors
Click Reduce Colors in the toolbar to cut down the number of colors in the pattern you have open — for example, to buy and sort fewer bead colors. The number you type is the number of colors you want to end up with, not the number to remove. Typing 62 means “finish with 62 colors.” The label above the box always tells you how many colors the pattern has right now (“pattern has 64 now”).
| Setting | What It Does |
|---|---|
| Reduce to this many colors | The number of colors you want the pattern to have afterward. It starts at about four-fifths of the current count. Typing the current count or more changes nothing. |
| Algorithm: Merge Closest Colors (recommended) | Combines the rarest, most alike colors first, one pair at a time, until exactly your number remain. Every color you keep is a bead color that was already in your pattern, so nothing is re-matched and no new colors appear. The pattern ends with exactly the number you asked for. |
| Algorithm: Bayer Matrix Dithering | Re-draws the pattern as a textured mix of fewer colors, then matches the result to the bead palette selected on the right. The final count is approximate, and the window says so. |
| Dither Matrix Size | Only for Bayer Matrix Dithering: 4 × 4 or 8 × 8. The larger matrix gives a finer texture. |
If you type a number equal to or higher than the colors you already have, the preview says “nothing would change” — type a lower number. A color that is merged away gives up its chosen symbol; the color it merges into keeps its own. Reduce a few colors at a time and look at the result: it is quick to Undo, and small steps let you keep control of which shades survive.
Confetti Cleanup
Click Cleanup to remove isolated single beads surrounded by a different color. The algorithm checks each bead's four neighbors. If all four neighbors share the same color and the center bead differs, the app replaces it with the majority color. This cleans up photo-converted patterns.
14. Transform a Pattern
| Tool | What It Does |
|---|---|
| Mirror | Flips the pattern horizontally (left-to-right). Useful for creating symmetric patterns. |
| Flip | Flips the pattern vertically (top-to-bottom). |
| Rotate | Rotates the pattern 90° clockwise. The app swaps width and height. Repeat three times for a full 360°. |
| Turn piece | Rotates 90° clockwise the way you would turn the real beadwork on the table. The bead holes turn too (see Bead Shape), and a peyote piece becomes brick while a brick piece becomes peyote, including 2-drop and 3-drop. Works on loom, square, peyote and brick patterns. Undo puts everything back. |
| Change stitch | Switches a loom pattern to square stitch, or a square stitch pattern to loom. The chart is laid out the same in both, so no bead moves; only the stitch type changes, and with it the thread length and time estimates. It asks first, and Undo puts it back. Loom patterns that have fringe must have the fringe removed first, because square stitch has no fringe. Other stitches have no identical twin and are not offered. |
You can undo all transforms with Ctrl+Z. The undo system preserves both the grid data and the dimensions.
15. Select, Copy, and Paste
Switch to the Select tool (S), then click and drag on the canvas to draw a selection rectangle. A dashed red border highlights the selected region.
| Action | Shortcut | What It Does |
|---|---|---|
| Copy | Ctrl+C | Copies the selected region to the clipboard. |
| Paste | Ctrl+V | Pastes the clipboard contents at the top-left corner of the selection rectangle. If you have no active selection, pastes at (0, 0). |
| Delete | Delete | Clears (erases) all beads inside the selected region. |
16. Place Text on the Canvas
Click the T button in the tool panel (or press T) to open the text dialog. Enter the text you want to place and choose a font size:
| Size | Bead Height | Bead Width per Character | Use Case |
|---|---|---|---|
| 5 (tiny) | 5 beads | ~4 beads | Small labels, annotations |
| 7 (small) | 7 beads | 5 beads | Standard text (native font size) |
| 9 (medium) | 9 beads | ~6 beads | Larger text, headings |
Click Place Text, then click anywhere on the canvas to stamp the text. The app renders text in the current drawing color. The built-in 5×7 font supports A–Z, 0–9, and common symbols.
Once placed, text becomes regular beads — you can edit, erase, or recolor individual beads.
17. Use the Image Trace Overlay
The trace overlay lets you display a reference image behind your bead grid while you hand-edit a converted pattern. The trace does not auto-enable on photo import — click the Trace button in the toolbar to load a reference image when you want one.
Controls
Once a trace image is loaded, the Trace slider appears in the toolbar. Slide it to adjust overlay opacity from 0% (invisible) to 100% (fully opaque). Click the × button next to the slider to remove the trace entirely.
18. Track Your Bead Inventory
Click Inventory in the toolbar to mark which bead colors you own. Owned colors display a green ✓ on their palette swatch and in the bead count table. Colors not in your inventory show a red ✗ in the bead count table so you know what to buy.
How to Add Beads
- Open the Inventory dialog (Inventory button).
- Click Add Current Color to add the active palette color, or Add All Pattern Colors to add every color used in the current pattern.
- Each entry shows the color swatch, name, brand ID, and a remove button.
Shopping List Integration
When you have inventory data, the CSV shopping list (Export CSV in the Counts dialog) adds an "In Inventory" column. Colors you own show "Yes" and colors you need show "NEED TO BUY".
19. Estimate Project Cost
The Cost Estimator helps you budget for a pattern before you buy beads. It lives inside the Counts dialog — click Counts in the toolbar, then expand the Cost Estimator section.
How to Use
- Set your Price per tube (default: $3.49).
- Set the Beads per tube (default: 1400 — typical for 11/0 Delica tubes).
- The estimator calculates how many tubes each color needs and the per-color cost.
- If you have inventory data, owned colors are crossed out and excluded from the total.
Cost data is also included in the CSV export when a price is set.
20. Calculate Sizes and Counts
Bead Count
Click Counts to open the Bead Count window, with a table that has one row for every color in your pattern. Each row starts with a little square that shows the color with its symbol on it, followed by the color name, its ID, the bead count, the weight in grams, and the percentage. Click a column heading (Color, ID, Count, Grams, or %) to sort by it. The app highlights low-count colors (default threshold: 5 beads) in orange — merge these to simplify your palette.
Finished Size Calculator
Click Size to calculate the real-world dimensions of your finished piece. Select your bead type from the dropdown:
| Bead Type | Width × Height |
|---|---|
| 11/0 Miyuki Delica | 1.6mm × 1.3mm |
| 11/0 Toho Round | 2.2mm × 2.2mm |
| 11/0 Miyuki Rocailles | 2.0mm × 2.0mm |
| 11/0 Matsuno | 2.0mm × 2.0mm |
| 11/0 Mill Hill | 2.5mm × 2.5mm |
| 11/0 Toho Aiko | 1.75mm × 1.0mm |
| 11/0 Toho Treasure | 1.7mm × 1.3mm |
| 8/0 Round | 3.0mm × 3.0mm |
| 15/0 Round | 1.5mm × 1.5mm |
| 10/0 Delica | 2.2mm × 1.6mm |
| Custom | Enter your own dimensions |
The result shows width and height in both millimeters and inches.
Bead Shape
Real beads are rarely square. A Delica, for example, sits a little taller than it is wide in loom work, so a chart drawn with square beads can look squat next to the finished piece. Bead Shape draws every bead on the chart in the shape of the beads you stitch with. Your design and your bead counts never change; only the way the chart is drawn.
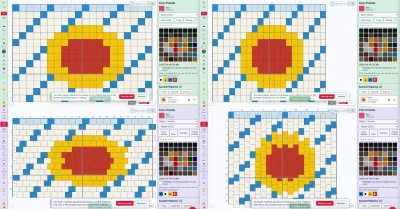
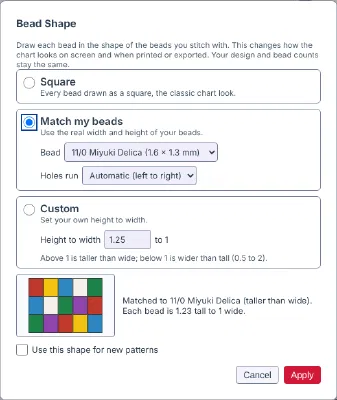
- Open it: click Analyze at the top of the screen, then Bead Shape (it sits next to Size). You can also click the Bead shape label at the bottom of the screen. That label only shows when the open pattern is not square.
- Square: the classic chart look. Every pattern starts square unless you choose otherwise.
- Match my beads: choose your bead from the list, such as 11/0 Miyuki Delica or 11/0 Toho Aiko. The small picture in the window shows the shape before you apply it. Round beads always draw square.
- Holes run: leave this on Automatic and the program picks the right direction for your stitch. Loom, square stitch and brick charts draw beads with the holes running left to right. Peyote and gourd charts draw them with the holes running up and down. Stitches such as herringbone and right angle weave stay square on Automatic; pick Left to right or Up and down yourself if you want a shape there.
- Custom: type your own height to width, from 0.5 (twice as wide as tall) to 2 (twice as tall as wide). A number above 1 is taller than wide.
- Brand Swap: a pattern set to Match my beads switches to the new brand’s bead when you swap, for example from Delica to Toho Round. Square and Custom stay as they are.
- Use this shape for new patterns: tick this box and every new pattern starts with the same shape. Each time a new pattern picks up the saved shape, a short message says so, so a shape is never carried over by accident.
- Reset to Square: one click puts the open pattern back to square beads and turns off the new-pattern setting.
- What uses the shape: the canvas, PDF and printed charts, the print layout and B&W chart pages, PNG, Hi-Res PNG and SVG pictures, the 3D preview, the Finished Size calculator, and the Brand Swap previews. Bead Shape changes can be undone with Undo or Ctrl+Z. The small pictures in the Saved Patterns list stay square.
- Photo Import: if you saved a shape for new patterns, Photo Import takes fewer rows for tall beads (or more for wide beads) so the finished piece keeps the photo’s proportions. The preview is drawn in the same shape, and the line under it says the rows were set for your bead shape.
Palette Brand Remap
Click Remap to convert all bead colors in your pattern to the nearest match in a different brand palette. This is useful when you designed with Miyuki Delicas but want to switch to Toho Rounds (or the other way around). Click Preview first to see the color mapping before committing.
Pattern Difficulty Score
Click Score to see a 0–100 difficulty rating for your pattern. The score considers:
- Size — larger patterns are harder (up to 30 points)
- Color count — more colors means more thread or needle changes (up to 25 points)
- Color complexity — frequent color changes within rows (up to 25 points)
- Confetti beads — isolated single beads surrounded by different colors (up to 10 points)
- Stitch type — advanced stitches like RAW and herringbone add difficulty (up to 10 points)
Ratings: Beginner (0–20), Easy (21–40), Intermediate (41–60), Advanced (61–80), Expert (81–100).
21. Choose Your Own Symbols
Every color in your pattern is marked with its own symbol, so you can tell the colors apart on a black-and-white printout. Symbols come in two styles, and you choose the style for each pattern: Classic shapes (118 pictures such as circles, squares and stars) or Easy to read (numbers, letters and keyboard symbols such as 1, A, @ and g, followed by the shapes). Classic shapes is the default. A symbol repeats only if a pattern has more colors than its style has symbols: 118 for Classic shapes, 196 for Easy to read.
Switch a pattern to Easy to read
Many beaders find numbers and letters quicker to follow while stitching than small pictures. To switch the open pattern:
- Click Counts to open the Bead Count window.
- Find Symbols for this pattern near the top of the window and choose Easy to read. The same choice is at the top of the small symbol window described below. To go back, choose Classic shapes.
- To make every new pattern start with Easy to read, tick Use Easy to read symbols for new patterns in the same place. Patterns you already have do not change.
With Easy to read, the program hands out the clearest symbols first: the numbers 1, 2, 3, 4, 5, 7, 8 and 10, capital and small letters that are hard to confuse, and keyboard symbols such as @ # $ & ( ) / + ? % * = ! < > ~. If a pattern has more colors than that, it goes on to letters and numbers that can be mistaken for each other when you turn the chart (for example 6 and 9, or b and q), then simple shapes, then the rest of the shapes. Every color still gets a different symbol until all 196 are used.
Unless you choose otherwise, the program hands out the symbols in the order the colors first appear when you read the pattern from left to right, starting with the top row. A color keeps the same symbol everywhere: on the chart (when the Symbols box in the row of buttons across the top is checked), in the Used in Pattern list, in the Bead Count window, in the PDF, in the Print Layout, and in the B&W Chart.
You can give any color a different symbol. There are two ways to open the small window where you choose it.
Way 1: From the Bead Count window
- Click Counts in the row of buttons across the top. The Bead Count window opens.
- Find the row for the color you want to change. The little square at the start of the row shows the color with its symbol on it.
- Click that little square. The symbol window opens.
Way 2: From the Used in Pattern list
- Find the list headed Used in Pattern in the panel on the right side of the screen, below the grid of palette colors. Each little square in it shows a color with its symbol.
- Point at the square for the color you want to change.
- Press the right mouse button. The symbol window opens.
What the symbol window shows
A small window opens on top of the picture. Its heading is Symbol for followed by the color’s ID and name. Below the heading, the style choice (Classic shapes or Easy to read) is followed by every symbol, one button for each, in groups: Numbers, Capital letters, Small letters, Keyboard symbols and Shapes. The groups scroll if the window is short. The group that matches the pattern’s style comes first.
- The symbol the color has now has a heavy outline around it.
- A small dot in the corner of a symbol means another color is already using that symbol. The dot shows which color has it. Rest the pointer on the symbol to see that color’s name.
- At the bottom are two buttons, Automatic and Close.
Choose, trade, or go back
- To choose a symbol — Click it. The window closes, and the new symbol shows on the chart, in the Used in Pattern list, and in the Bead Count window.
- To trade with another color — Click a symbol that has a dot. The two colors trade: your color takes that symbol, and the other color takes the symbol your color had.
- To go back to the automatic symbol — Click Automatic. That color gets the symbol the program would give it by itself. The button is gray and cannot be clicked until you have chosen a symbol for that color.
- To leave without changing anything — Click Close, press Esc, or click anywhere outside the small window.
The symbols you choose are saved with the pattern. They are still there when you save and reopen the pattern, when you make a copy with Duplicate, and when you export the pattern and import it again.
Symbol colors on the chart
The chart on screen looks like the printed chart. Each bead fills its whole cell in its true color with a thin dark grid line between beads. The symbol is drawn directly on the colored cell. The program picks black or white for each one, whichever stands out more against that color, so symbols are black on light and middle shades and white on dark ones. Printouts and PDFs use the same choice. The same applies in the Used in Pattern list. To follow one symbol across the chart, use Highlight the chosen symbol.
.txt file inside a .ksp package) prints each symbol as a character, so how it looks depends on the fonts on the computer that opens it. It may not look the same as the symbol on the screen. The Easy to read symbol 10 is written as the two characters 1 and 0.22. Export and Share Patterns
Export PDF
Click Export PDF to save a print-ready PDF of your pattern. The program saves it as a file named after your pattern (for example PatternName.pdf) in the place your browser keeps downloads, so open that file to print it. The PDF has a color key and the pattern grid, with each bead’s symbol on its color. The key lists each color with its symbol and bead ID, and it fits on the page. If a bead name is too long for its space, the name ends with “...”. The thin grid lines are gray, and every 10th row and every 10th column has a bold black line, so the pattern breaks into 10 × 10 blocks that are easy to count.
Print… Settings
To choose how the PDF prints, click Print… in the row of buttons across the top. The Print / PDF Settings window opens. Make your choices, then click Export PDF in that window.
- Cell Size (pts), Paper Size (US Letter, US Legal, A4, A3, or Tabloid), and Orientation (Landscape or Portrait).
- Custom Text/Branding — your name or shop name, printed on every page.
- Page Overlap (cells) — repeats this many rows and columns on each page next to it, to make lining up the pages easier.
- Legend Placement — Separate page, Same page as first grid page, or Auto (same page if it fits).
- Color Mode — Full Color prints each bead as its color. Symbols Over Color prints the symbol on every colored cell. Black & White Symbols Only prints just the symbols in black, for a printer with no color ink.
- Presets — click Save as Preset to keep your choices and pick them again later from the list.
Export PNG
Click Export PNG to save the pattern as a PNG image file. Each bead renders as a 10×10 pixel square. The resulting image is useful for sharing previews online, embedding in documents, or printing.
Export SVG and 300 DPI Export
Click Export SVG to save a scalable vector chart of your pattern. Click 300 DPI Export to save a PNG sized so that, when it is printed at your pattern’s real-world finished size, it comes out at exactly 300 pixels per inch.
Word Chart
Click Word Chart to export a formatted HTML word chart. The chart includes:
- A color legend with color blocks showing each bead color, ID, and name
- Row-by-row chart with colored bead blocks and run-length instructions (e.g., "3 Black, 5 Red, 2 White")
- A bead count summary table sorted by quantity
Open the HTML file in any browser and print it. The chart is styled for clear readability at the bead table, with alternating row shading and compact color blocks. This is the document beaders work from while stitching.
Export Pattern and Import Pattern
Export Pattern saves the current pattern as a .ks JSON file. This includes all grid data, colors, dimensions, and pattern settings. Use this to back up your work or transfer patterns between computers.
Import Pattern loads a previously saved .ks, .json, or .ksp package file and adds it to your saved patterns. See the next section for details on .ksp packages.
Batch Export
Click Batch Export to export several saved patterns to PDF and/or PNG in one operation — useful when you have a whole catalog of listings to prepare at once instead of opening and exporting each pattern individually. Check the patterns you want to include (all are checked by default), choose PDF, PNG, or both, then click Start Export. Every pattern in the batch uses your current Print settings (cell size, paper size, orientation, and custom branding text) so you only configure them once. A progress line shows which pattern is currently exporting; if one pattern fails (for example, corrupted data), it is skipped and noted in the summary while the rest of the batch continues. When finished, all the generated files are bundled into a single .zip file and downloaded.
To go the other direction — converting several photos into new patterns at once — see Batch Photo Import under Import and Convert a Photo.
23. Share, Archive, and Import Patterns
Krazy Stitcher v1.1 introduces .ksp (Krazy Stitcher Package) files — a zip-based format that bundles everything related to a pattern into a single file for sharing or archiving.
What’s Inside a .ksp File
A .ksp package contains six files:
| File | Purpose |
|---|---|
PatternName.ks | The full pattern data (grid, colors, dimensions, color map). This is the file Krazy Stitcher uses to reconstruct the pattern. |
PatternName.png | A PNG preview image of the pattern. Useful for quick viewing without opening the app. |
PatternName.pdf | A print-ready PDF with the full color grid, symbol legend, and bead count summary. |
PatternName - Word Chart.txt | A text-based row-by-row chart with symbol mapping and run-length instructions. |
PatternName - Bead Count.csv | A CSV spreadsheet with color names, IDs, hex values, bead counts, and percentages. |
metadata.json | Machine-readable info: pattern name, type, dimensions, bead count, color count, export date, and Krazy Stitcher version. |
Sharing a Pattern
- Open the pattern you want to share.
- Click the ✉ Share button in the toolbar.
- A dialog appears with two options:
- Share via… — Uses your device’s native share menu (email, messaging apps, AirDrop, etc.). This option appears only on devices that support the Web Share API (most phones and modern desktop browsers).
- Download .ksp File — Saves the package to your computer. You can then attach it to an email, upload it to a forum, or send it any way you like.
.ksp file is a standard zip archive with a different extension. If someone wants to peek inside without using Krazy Stitcher, they can rename it to .zip and extract the PNG, PDF, or CSV normally.Archiving a Pattern
Archiving saves a complete .ksp package to your computer and, once you confirm the file saved, removes the pattern from your browser’s local storage. This is useful for keeping your pattern list clean while preserving finished work.
- Click the 📦 Archive button in the toolbar (archives the current pattern), or click the small 📦 icon next to any pattern in the sidebar list.
- Confirm the archive. The
.kspfile downloads automatically. - Krazy Stitcher asks you to check that the
.kspfile is in your Downloads folder. Click OK to remove the pattern from your browser storage, or Cancel to keep it (you can archive it again later).
.ksp file. Store it somewhere safe — a dedicated folder, cloud backup, or external drive.Importing a Pattern
To load a pattern from someone else, or to restore an archived pattern:
- Click Import Pattern in the toolbar.
- Select a
.ksp,.ks, or.jsonfile. - Krazy Stitcher imports the pattern and adds it to your saved patterns list. It assigns a new unique ID, so it will not overwrite any existing patterns.
When you load a .ksp file, Krazy Stitcher extracts the .ks data inside the package. The package includes PNG, PDF, and other files for convenience, but only the .ks file contains the pattern data.
A Note on Format Compatibility
There is no universal standard file format for bead patterns. Every beading software uses its own proprietary format:
- BeadTool uses an internal database file.
- Beadographer stores patterns on its own servers (web-based only).
- JBead uses
.jbbfiles, but only for bead crochet rope patterns. - Bead-n-Stitch has its own format as well.
The closest thing to an open standard in the broader craft space is the OXS (Open Cross Stitch) format, but it’s designed for cross-stitch, not beadwork.
Because of this, .ksp files can only be opened by Krazy Stitcher. However, every package includes a PNG preview and a print-ready PDF, so recipients can always see the pattern even without the app. To work with the pattern in a different tool, the PNG image can be imported into most beading software via their photo-import feature.
.ksp file along with a link to Krazy Stitcher. They can open the app in any browser, click Import Pattern, and load the package immediately — no install, no account.24. Manage Saved Patterns
Krazy Stitcher stores all patterns in your browser's IndexedDB. This provides virtually unlimited local storage (typically several hundred megabytes). Patterns persist across browser sessions — you do not need to save to a file every time.
Pattern Management
- Save — Saves the current pattern to IndexedDB. The status bar shows total storage used.
- Duplicate — Creates a copy of the selected pattern. Great for experimenting without risking your original.
- Delete — Click the red × button on any pattern in the list to remove it.
- Clear All — Removes all saved patterns (use with caution).
25. Keyboard Shortcuts
| Key | Action |
|---|---|
| D | Draw tool |
| E | Erase tool |
| F | Fill tool |
| I | Color picker / eyedropper |
| L | Line tool |
| R | Rectangle (outline) |
| Shift+R | Filled rectangle |
| S | Select tool |
| T | Text tool |
| G | Stitching Guide on or off |
| Ctrl+Z | Undo |
| Ctrl+Y | Redo |
| Ctrl+C | Copy selection |
| Ctrl+V | Paste at selection |
| Delete | Clear selection |
| Ctrl+X | Cut selection |
| Ctrl+S | Save the pattern |
| Arrow keys | Move the selection (with the Select tool) |
| + or = | Zoom in |
| - | Zoom out |
| Home | Zoom to fit |
| Space (hold) | Pan mode (with any tool) |
| Scroll wheel | Zoom in or out |
| N | Toggle row and column numbers |
| M | Cycle symmetry mode (none → horizontal → vertical → both) |
| Shift+S | Scale pattern |
| Shift+L | Pattern templates |
| Shift+T | Tile the selection (with the Select tool) |
| U | Tubular preview |
| Shift+I | Show or hide shaping indicators |
| ] and [ | Add one to, or take one from, the row/round progress counter |
| Ctrl+Shift+B | Open the Report a Bug or Request a Feature window (from anywhere in the app) |
| F11 | Toggle fullscreen mode |
| Esc | Exit fullscreen / close the help panel / close an open window, including the symbol window |
26. Track Progress Row by Row
The Row Work Tracker helps you keep your place while beading. Click Tracker in the toolbar to open the tracking panel.
How to use
- Click Tracker to activate. The panel appears in the bottom-left corner.
- Click Next Row each time you finish a row. The tracker highlights your current row in green on the canvas and dims completed rows.
- Click Prev Row to go back if you made a mistake.
- Click Jump to Row to skip to a specific row number.
- Click Reset to start over from row 1.
Your progress saves automatically with the pattern. When you reopen the pattern later, the tracker picks up where you left off.
27. Search and Filter Patterns
When you have many saved patterns, use the search and filter controls above the pattern list in the sidebar.
Search by name
Type any part of a pattern name in the search box. The list filters instantly as you type.
Filter by stitch type
Select a stitch type from the dropdown to show only patterns of that type. Choose "All types" to clear the filter.
Search and filter work together — you can type a name and select a stitch type at the same time.
28. Realistic Bead Preview
Check the Shading checkbox in the toolbar to switch from flat square rendering to a realistic bead view. Each bead draws as a rounded ellipse with a highlight, shadow, and thread hole. To turn the pattern around in a rotatable 3D view, click the 3D Preview button in the toolbar instead.
When to use
Realistic mode gives you a better sense of how the finished piece will look. It works best at medium to high zoom levels. At low zoom (below 4px per bead), the app falls back to flat rendering for performance.
29. Backup and Restore All Data
Click Backup All to export every pattern, custom palette, and bead inventory item as a single .ksbackup file. This is your complete workspace snapshot.
Create a backup
- Click Backup All in the toolbar.
- The app downloads a file named
KrazyStitcher-Backup-YYYY-MM-DD.ksbackup. - Store this file somewhere safe. For an automatic off-device backup, save it into a cloud-synced folder — Google Drive, Dropbox, and OneDrive all work — and that service will copy it off your computer for you. A USB drive or external drive works too, just without the automatic part.
Restore from a backup
- Click Restore in the toolbar.
- Select your
.ksbackupfile. - Confirm the restore. Existing patterns are preserved — if the backup contains a pattern with the same ID, the backup copy overwrites it.
Move your patterns to a new computer
Your patterns live inside the browser on the computer where you made them. They don’t follow you to another computer, another browser, or a new copy of Windows on their own — you carry them over with a backup file.
- On the old computer, open Krazy Stitcher Studio and click Backup All. A
KrazyStitcher-Backup-YYYY-MM-DD.ksbackupfile lands in your downloads folder. - Copy that file to the new computer — a USB stick, an email to yourself, or a cloud folder such as OneDrive, Dropbox, or Google Drive all work.
- On the new computer, open Krazy Stitcher Studio, enter your license key if asked, and click Restore.
- Pick the
.ksbackupfile and confirm. Every pattern, custom palette, and inventory item comes across.
Just one pattern? If you saved a pattern as a .ksp (from Share → Download .ksp File or Archive) or a .ks (from Export Pattern), copy that file to the new computer and open it with Import Pattern. A password-protected .ksp asks for its password when you open it.
Where are my .ksp files? Only where you saved them. Krazy Stitcher doesn’t keep patterns as files on its own — a .ksp exists only once you create one, and it goes wherever your browser saves downloads (usually your Downloads folder).
Your license key works on up to 3 computers you own, so you can enter the same Studio key on the new machine. Before you switch, open About on the old computer and click Copy key under Your license — it shows your edition and the last 4 characters of the key. The key is also in your Gumroad receipt email.
30. Automatic Folder Backup
On top of the rolling Version History snapshots and manual Backup All exports, Chrome, Edge, and other Chromium-based browsers can save a real backup file to a folder on your computer automatically — no clicking Backup All required. Point that folder at a Dropbox, OneDrive, or iCloud Drive folder that syncs to your other devices, and your patterns follow you there too.
What it does
Once set up, every automatic snapshot Krazy Stitcher already takes (on Save, roughly every 20 minutes while you work, and when you switch patterns) is also written as a KrazyStitcher-Snapshot-<date-and-time>.ksbackup file into the folder you chose — the same file format as a manual Backup All export. To avoid flooding the folder, the same pattern won’t be re-exported more than once every 5 minutes.
Set it up
- Click Version History in the toolbar.
- Scroll to the Folder Auto-Backup section at the bottom of the panel.
- Click Set Up Folder Auto-Backup.
- Choose a folder in the picker your browser shows, and grant it read/write access. Any folder works, but a folder that a cloud sync app (Dropbox, OneDrive, iCloud Drive, Google Drive desktop) is already watching is what lets the backup leave this computer on its own.
Once it’s on, the panel shows On along with Turn Off and Pull Latest Snapshot buttons. Chrome and Edge don’t always remember folder permission forever — if it lapses, the panel shows Re-authorize Folder instead; click it and pick the same folder again to resume.
Bring patterns to a second device
Folder Auto-Backup also works the other direction, letting you carry patterns between two computers that both sync the same cloud folder:
- On your first computer, set up Folder Auto-Backup pointed at your synced Dropbox (or OneDrive/iCloud Drive) folder, and keep working — snapshots accumulate there automatically.
- On your second computer, make sure that same folder has finished syncing locally, then set up Folder Auto-Backup there too, pointed at it.
- Click Pull Latest Snapshot. Krazy Stitcher scans the folder for the most recently saved snapshot and restores it — the same confirmation and merge behavior as restoring a manual backup (see Backup and Restore All Data): your existing patterns are kept, and anything with a matching ID is overwritten by the snapshot copy.
31. Split and Recompose Large Patterns
Split a large pattern into a grid of smaller tiles you can stitch one at a time — each tile is a full, independent pattern with its own toolset — then use Recompose to merge your finished tiles back into the original full-size pattern.
Split a pattern
- Open the pattern you want to split.
- Click Split/Recompose in the toolbar.
- Enter how many rows and columns to split into. The preview shows the tile boundaries and roughly how many beads each tile will be — for example, a 300×300 pattern split 3 rows × 3 columns makes nine 100×100 tiles.
- Click Split Pattern. Krazy Stitcher creates one new pattern per tile, named after the original with its position added —
My Pattern — R1C1,R1C2, and so on — and switches you to the first one.
If the split doesn’t divide evenly, the extra rows or columns are added to the last tile in that row or column, so every other tile stays a clean, consistent size.
Work on the tiles
Each tile behaves like any other pattern — switch between them from the pattern list, and use the full set of drawing tools, color palettes, and everything else in Krazy Stitcher on each one independently. This is the point of splitting: a tile small enough to stitch from your phone on the bus, or to hand off to someone else to bead, instead of wrestling with the whole oversized pattern at once.
Recompose the finished tiles
- Open any one of the tiles.
- Click Split/Recompose in the toolbar again. Because this pattern is a tile, the panel now shows how many of the tiles from this split are still in your pattern list.
- If any are missing — deleted or otherwise not found — the panel lists which ones (for example,
R2C3) and Recompose is disabled until you restore them. - Once all tiles are present, click Recompose. Krazy Stitcher merges every tile’s grid back into one full-size pattern in the correct position — updating the original pattern if it’s still in your list, or creating a new one if it isn’t.
32. Generate a Print Layout
Click Print Layout to generate a print-optimized HTML document you can open in any browser and send to your printer.
What the print layout includes
- Cover page — pattern name, dimensions, stitch type, color legend with symbols, bead count summary table, and pattern notes.
- Symbol grid pages — the pattern grid with each bead shown as its assigned symbol on a colored background. Large patterns split across multiple pages (50 columns × 60 rows per page). Each page shows column and row numbers and a page footer for reassembly. The symbols are the same ones you see on the chart and in the Bead Count window, including any you chose yourself, and they look the same on any computer.
The program saves the layout as a file named like PatternName - Print Layout.html in the place your browser keeps downloads. If you set Page Overlap or Legend Placement in the Print… window, the Print Layout uses those choices.
How to print
- Open the downloaded HTML file in your browser.
- Press Ctrl+P (or Cmd+P on Mac).
- Set paper size to Letter or A4. The layout adapts to both.
- Print in color for the best readability. The symbols also work in grayscale.
33. Scale Your Pattern
Click the Scale button in the toolbar (or press Shift+S) to resize your pattern. A dialog opens with three fields:
| Field | What It Does |
|---|---|
| Width | The target width in beads. |
| Height | The target height in beads. |
| Lock Aspect Ratio | When checked, changing width automatically adjusts height (and vice versa) to preserve the original proportions. |
Enter the new dimensions and click Apply. The app resamples the pattern using nearest-neighbor sampling, which keeps bead edges sharp and avoids blending colors. Each bead in the resized pattern maps to the closest bead in the original.
34. Find Color Harmonies
The Color Harmony tool suggests harmonious color combinations based on color theory. Click Harmony in the toolbar to open the dialog. Select a base color from the palette, choose a harmony type, and the app calculates matching colors mapped to the nearest beads in your active palette brand.
Harmony Types
| Type | How It Works |
|---|---|
| Complementary | Returns the color opposite the base on the color wheel. High contrast, bold pairings. |
| Analogous | Returns colors adjacent to the base on the color wheel. Low contrast, naturally cohesive palettes. |
| Triadic | Returns two colors evenly spaced (120°) from the base. Vibrant and balanced. |
| Split-Complementary | Returns the two colors flanking the complement. Strong contrast with less tension than pure complementary. |
| Tetradic | Returns three colors forming a rectangle with the base on the color wheel. Rich, four-color schemes. |
Each result swatch shows the closest match from the active palette, including the bead name and ID. Click any result swatch to make it your active drawing color.
35. Use Layers
Layers let you separate parts of your design onto independent drawing surfaces. The active layer receives all drawing, erasing, and fill operations. Other layers remain untouched.
The Layers Panel
The Layers panel is in the panel on the right side of the screen, below the list of colors. Click its heading to open or close it. Each layer row shows:
- Visibility eye — Click to show or hide the layer on the canvas. Hidden layers are excluded from drawing but preserved in the pattern data.
- Opacity slider — Drag to adjust the layer’s opacity from 0% (fully transparent) to 100% (fully opaque).
- Lock toggle — Lock a layer to prevent accidental edits. Locked layers ignore all drawing tool input.
Managing Layers
| Action | What It Does |
|---|---|
| Add | Creates a new empty layer above the active layer. |
| Delete | Removes the active layer and its contents. |
| Merge Down | Combines the active layer with the layer directly below it. The merged result replaces the lower layer. |
| Rename | Double-click a layer name to edit it. Use descriptive names like “Background” or “Border Detail.” |
Click a layer row to make it the active layer. The active layer is highlighted in the panel and receives all drawing input.
Flatten for Export
When you export (PNG, PDF, Print Layout, or Word Chart), the app automatically flattens all visible layers into a single composite. Hidden layers are excluded from the export. To flatten manually, merge layers from top to bottom until only one remains.
36. Stamp Pattern Templates
Pattern Templates let you stamp pre-built letters and shapes onto the canvas. Click Templates in the toolbar to open the template picker.
Alphabet Stamps
The template library includes uppercase letters A–Z and digits 0–9, rendered in a compact 5×7 pixel font. Select a character, choose your drawing color, and click the canvas to stamp it. Each character occupies a 5-wide by 7-tall bead area.
Shape Stamps
In addition to letters, the following shape stamps are available:
- Heart
- Star
- Flower
- Diamond
- Arrow
Placement
If you have an active selection, the stamp places at the top-left corner of the selection rectangle. Otherwise, the stamp places at the center of the visible canvas. Once stamped, the template becomes regular beads that you can edit, recolor, or erase.
37. Use Stitch-Along Autoplay
Stitch-Along Autoplay steps through your pattern row by row on a timer, so you can follow along at your beading pace without clicking. Click Guide in the toolbar (or press G) to open the Stitching Guide, which has the autoplay controls.
Controls
| Control | What It Does |
|---|---|
| Auto | Start the automatic advance. While it runs, the button says Stop; click it to stop. |
| Speed | Choose Slow, Medium, or Fast. Slow gives you the most time per row; Fast advances quickly for experienced beaders or previewing. |
| Tick | Check this box to hear a short tick each time the guide advances to the next row. Useful when your eyes are on the beadwork, not the screen. |
Minimap
While autoplay is active, a minimap appears in the corner of the canvas showing your current position within the full pattern. The highlighted band on the minimap tracks the active row so you always know where you are, even when zoomed in.
Click Stop at any time to stop the advance. You can manually jump to a different row, then resume playback from there.
38. Import External Formats
Krazy Stitcher can import patterns from several external file formats. Click Import Pattern in the toolbar and select a supported file. The app auto-detects the format and shows a preview before you confirm the import.
Supported Formats
| Format | Extension | Description |
|---|---|---|
| BeadTool XML | .bead | XML-based pattern files exported from BeadTool 4. The importer reads the grid dimensions, bead colors, and stitch type from the XML structure. |
| CSV Hex Grid | .csv | Comma-separated grid where each cell contains a hex color value (e.g., #FF0000). One row per line, one column per cell. Imported as a Loom pattern by default. |
| Plain Text Grid | .txt | Space- or tab-separated grid of single-character symbols or short color codes. Each unique symbol maps to a distinct color. Useful for quick hand-typed patterns. |
Preview and Confirm
After selecting a file, a preview dialog shows the detected format, grid dimensions, and a thumbnail of the pattern. Review the preview to verify the import looks correct, then click Import to add the pattern to your saved list. If the auto-detection picks the wrong format, select the correct one from the format dropdown in the preview dialog.
Fullscreen Mode
Click the ⛶ Fullscreen button in the top toolbar to hide all browser chrome — tabs, address bar, and bookmarks bar — and give your pattern the entire screen. This is especially useful on smaller screens or laptops. Press Esc or click the button again to exit fullscreen. You can also press F11 in most browsers.
Tip: If you find the browser's bookmarks bar takes up too much space but don't want full fullscreen, press Ctrl+Shift+B (or Cmd+Shift+B on Mac) to toggle just the bookmarks bar on or off.
Touch & Pen Support
Krazy Stitcher works with touchscreens and digitizer pens (stylus devices). All drawing tools — Draw, Erase, Fill, Color Pick, Line, Rectangle, and Select — respond to touch and pen input alongside traditional mouse input.
No setup is required. Simply touch the canvas or use your stylus to draw, erase, or interact with the tools. Pan and zoom gestures work as expected on touch-enabled devices.
Scroll-Zoom Lock
If you find the scroll wheel accidentally zooming your canvas, click the lock icon (🔒) in the left toolbar, below the zoom-in and zoom-out buttons. When locked, scroll-wheel zoom is disabled and the icon changes to 🔓. Click it again to re-enable zoom.
View Lock
View Lock (📌) locks both panning and zooming at once, preventing any accidental repositioning of your pattern on the canvas. Click the pushpin icon in the left toolbar to engage it — when View Lock is on, scroll-zoom is also automatically locked along with panning. Click the pushpin icon again to unlock.
B&W Chart
Click the B&W Chart ▾ dropdown in the toolbar to access black-and-white symbol chart options. Each bead color is mapped to a unique symbol, making the chart suitable for printing and working away from a screen. Three options are available:
| Option | What It Does |
|---|---|
| Show as Overlay | Replaces the color canvas with a B&W symbol view. A B&W ON / Return toggle appears in the toolbar next to the pattern title — click it to switch back to the color view. |
| Open as Separate Page | Opens the B&W chart in a new browser tab with a Return button to navigate back. |
| Save as File | Downloads the B&W chart as a standalone HTML file (named like PatternName - BW Symbol Chart.html) you can open, print, or share. |
The B&W chart uses the same symbols as the chart on the screen, including any you chose yourself (see Choose Your Own Symbols). The chart that opens in a new tab and the saved file both draw the symbols the same way on any computer. Each one begins with a Symbol Legend and a Bead Count Summary table, followed by the pattern pages. If your browser blocks the new tab, a message asks you to allow pop-ups for this page or to use Save as File instead.
39. Improve Your Workflow
Photo-to-Pattern Workflow
- Import with K-Means quantization and Floyd-Steinberg dithering for best results. Try the Sample Photo first to experiment with dithering styles.
- Adjust brightness, contrast, and saturation before importing — use the Side/Stack toggle and preview until it looks right.
- Run Cleanup immediately after import to remove confetti beads.
- Open Counts to find low-count colors (highlighted in orange).
- Use Merge to fold near-duplicate colors together.
- Hand-edit details with the Draw and Erase tools, using the trace overlay as a guide.
- Export as PDF for printing or Word Chart for row-by-row instructions with color blocks.
Design Tips
- Use Duplicate before making major changes so you can always go back.
- For symmetric patterns, press M to turn on Symmetric Drawing and draw in real time. Or build one half manually, then use Mirror to create the other side.
- Check the Symbols box (in the row of buttons across the top, next to Grid) to verify color placement on complex patterns — each color shows its own symbol on the chart. To change a color’s symbol, see Choose Your Own Symbols.
- Use the Color Pick tool (I) to quickly grab colors from existing parts of your pattern.
- Check the Size Calculator early — a pattern that looks small on screen might be surprisingly large (or small) in real beads.
Performance
Krazy Stitcher handles patterns up to 1000×1000 beads, but very large patterns may render slower. For best performance on complex patterns, keep the grid under 500×500 beads. Turn off the grid overlay at high zoom levels if rendering feels sluggish.
40. Solve Common Problems
| Problem | Solution |
|---|---|
| Pattern not saving | Click Save manually. Check the status bar's storage indicator. If your browser's IndexedDB is full (very rare), export patterns as files and clear old ones. |
| Photo import looks washed out | Increase contrast and saturation in the photo import dialog. Try K-Means quantization for better color accuracy. |
| Too many colors after import | Lower the Max Colors setting, or import with a higher number and use Merge afterward for more control. |
| Fewer colors than I requested | The Max Colors setting is an upper limit, not an exact target. Two things reduce the final count: (1) if your image doesn't have enough color variation, the quantizer may produce fewer groups; (2) when quantized colors are mapped to the nearest bead in your palette, multiple quantized colors can land on the same bead. Check the status line below the preview to see the actual count before importing. If you need more colors, try increasing Max Colors beyond what you want, or switch to K-Means quantization for better color separation. |
| White dots scattered across pattern after import | This is caused by the Floyd-Steinberg dithering algorithm distributing quantization error to neighboring pixels. Three fixes: (1) Click Cleanup to automatically remove isolated single-color beads. (2) Use Recolor to replace all white beads with a specific color. (3) Try importing again with dithering set to None for cleaner color blocks (at the cost of less smooth gradients). |
| Grid lines obscure the pattern | Uncheck the Show Grid checkbox in the toolbar to hide grid lines entirely. Zoom in to see individual bead colors more clearly — grid lines become less dominant at higher zoom levels. You can toggle the grid on and off as needed while working. |
| Hard to compare pattern to original photo | Click Trace in the toolbar and choose the original photo to load it as a trace overlay; it is not loaded for you when you import. When a trace is loaded, a Trace slider appears in the toolbar. Use it to blend the original over your pattern. Set it to 0% to hide the photo, or higher to see the original more clearly. You can also keep a copy of the original open in another window for side-by-side reference. |
| Can't load photos from iCloud or network drive | Use any of these methods: (1) Drag and drop the image from a Finder window directly onto the canvas — Finder can browse iCloud Drive, network shares, and external drives. (2) Click Import Photo, then click the drop zone to open the file picker, which shows all mounted drives in the sidebar. (3) Copy the image in Finder or Photos and press Cmd+V to paste it directly. |
| Canvas feels sluggish | Zoom out or turn off the grid display. Very large patterns (800+ beads wide) require more rendering time. |
| Undo doesn't restore correctly after rotate | The current version fixes this. If you see issues, refresh the page to load the latest code. |
| Can't find my saved patterns | Krazy Stitcher stores patterns per browser and per domain. If you opened the file from a different location or browser, previous patterns won't appear. Use Backup All and Restore to bring them over — see Move your patterns to a new computer. |
| Share button says “Share via…” is missing | The native share option requires a browser that supports the Web Share API (Chrome, Edge, Safari on mobile). Use Download .ksp File instead. |
| .ksp file won’t import | Make sure the file has a .ksp or .zip extension and contains a .ks file inside. If the file was renamed or corrupted during transfer, try downloading it again. |
| The app opens but there’s no place to enter my license key, or it shows an old version number | Your browser is showing an older saved copy of the app. Add ?v=2 to the end of the address — https://krazystitcher.com/KrazyStitcherStudio.html?v=2 — and press Enter; the license screen appears. If that doesn’t work, click Backup All first to protect your patterns, then clear this site’s data in your browser settings (search “krazystitcher” under Cookies and site data) and reload. |
| I moved to a new computer and my patterns aren’t there | Patterns stay in the browser where you made them. Make a Backup All file on the old computer, copy it over, and click Restore on the new one. See Move your patterns to a new computer. |
| Where are my .ksp files? | A .ksp only exists if you made one with Share → Download .ksp File or Archive. It is saved wherever your browser puts downloads, usually your Downloads folder. |
| I clicked Export PDF and nothing opened | Export PDF saves the PDF as a file; it does not open it for you. Look in the place your browser keeps downloads for a file named after your pattern, and open it from there. Some browsers show a small message when a download finishes, and some ask you before saving. |
41. Supplies & Resources
Ready to start stitching? We have curated a complete list of recommended beading supplies, tools, and books — all available on Amazon. The resource page covers seed beads (Miyuki, Toho, Preciosa), thread and stringing materials, needles, looms, workspace tools, lighting, pattern books, technique guides, and finishing supplies.
42. Explore the Full Krazy Stitcher Lineup
Krazy Stitcher Base — one-time purchase
Design bead patterns from any photo or from scratch — offline, no subscription.
- 22 stitch types, dark mode, configurable print/PDF export with branding & saved presets
- Built-in Thread & Bead Estimator, Row/Round Progress Counter, and Backup All / Restore
- Commercial-use rights included — sell finished crafts and individual patterns you create
- Keyboard shortcuts overlay (press ?)
- One-time purchase, works fully offline
Krazy Stitcher Pro — one-time purchase
Everything in Base, plus 3 more stitch types (25 total — Ladder Stitch, Albion Stitch, and Bead Crochet Rope), rotatable 3D preview, live symmetric drawing, brand remapping, a difficulty score, bead inventory tracking, a cost estimator, gradient fill, custom bead palettes, real SVG/CSV export, Color Reduction (Median Cut/Bayer dithering), 300 DPI hi-res export, Enhanced Backup (Version History), and the 66-design Starter Pattern Library.
Krazy Stitcher Studio — one-time purchase
Everything in Pro (including the same 66-design Starter Pattern Library), plus multi-layer editing, a Multi-Pattern Workspace (tab between and compare up to 4 patterns), a 6-type Color Harmony Engine, Batch Export (bulk PDF/PNG export of multiple saved patterns to a single .zip), and Batch Photo Import (convert several photos into separate patterns in one pass). Studio also adds the exclusive right to bulk/wholesale distribution and publishing pattern collections or books — a step beyond the individual-pattern commercial rights every edition includes.
Photo-to-Pattern Converter — standalone add-on, works with any edition
Turn any photo into a ready-to-stitch bead pattern. 9-brand, 1,814-color database, Median Cut/K-Means/Bayer Matrix dithering choice, full brightness/contrast/saturation control, WCAG AA audited.
Color Palette Tool — free standalone tool
Build a bead-accurate color palette before you open a pattern. 6 harmony types, Delta-E/Lab matching across 5 brands/1,269 colors. One-click “Send to Krazy Stitcher.”
PatternFolio — coming soon
In development — details to come once it's finished and merged into the lineup.
Bead Conversion Chart Bundles
Cross-brand conversion charts — currently 47 charts covering Miyuki, Toho, DMC, Perler, Hama, Artkal, Nabbi, and more — for matching colors when you switch bead or craft brands.
No pricing here — visit krazystitcher.com to compare editions and see current pricing.